
Did you know you could create screen-recordings on a your Mac with Quicktime Player?
Yes, you can, and it’s easy. Make sure you’re running Mac OS X 10.6.8 or later and with Quicktime Player screen-recording, you can record whatever is on your screen, whether it is web-based or not. This sets it apart from web-based only screen-recording apps or extensions which record items that run in your internet browser.
Here's what to do:
- Find and open Quicktime Player from the Applications folder located in Finder. If it’s not already there, drag the Quicktime Player app/icon to the Dock for easy access to it.

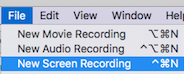
- Click File > New Screen Recording
- Next to the record button, click the down arrow and select either the internal microphone unless you’d like to add an external microphone.
- Click the red record button to begin recording.
- This message will appear to select either recording in full screen or dragging to select part of a screen.
- To stop recording, click stop from the menu bar (you'll see a tiny stop button on the top-right near the clock) or right-click the Quicktime Player icon from the Dock and select Stop Recording.
- Click File > Save > and select a place that’s easy for you to find your recording, like the Desktop.

You now have a video file of your screen recording that is ready to use. You can do things like upload it to YouTube or upload and share it via Google Drive. If you want to enhance your screen-recording further, you can easily import it into a movie editing tool such as iMovie or WeVideo.
No comments:
Post a Comment