Showing posts with label iOS. Show all posts

Monday, April 3, 2017

You Can Do Anything With Explain Everything - Week 8


'Some apps are like Swiss army knives.Some can do more than you think. Some can be used in thousands of ways in the classroom. Explain Everything is one such app.' - Nick Ackton (via Explain Everything's site)
Explain Everything is an amazing interactive whiteboard app and there are so many things you can do with it to enhance learning. On their website, they list several different ways to use it and include all the Explain Everything features.

Although there are tons of different ways to use Explain Everything, I’ve narrowed it down to four of my favorites. The first two are powerful because they can easily turn an iPad or tablet into an interactive whiteboard, just like that.

First, what you'll need to make them interactive:

  1. iPad or tablet.
  2. AirserverApple TV, or something similar in order to display your device screen. 
  3. Apple Pencil, stylus, or your finger. 

Four of my favorite ways to use Explain Everything:
  1. Interactive Presentations - If you want to display a presentation to your students and make it interactive so for example you can write on it or manipulate objects, you can do that with Explain Everything. There are different options to make your presentations interactive.

    • Create the presentation from scratch using the Explain Everything blank templates or,
    • Import a PDF or image of your existing presentations. Your presentations can be Google Slides, PowerPoint, ActivInspire Flipcharts, etc. Explain Everything will easily connect to your Google Drive if have the PDF or images you want to import saved in there.
      To import, click the plus sign > Photo, Video, File
    • Once you import, you can draw right on the slides, add moveable shapes, etc. just like you would using interactive software such as SMART or Promethean ActivInspire.
  2. Whiteboard - Just like a whiteboard hanging in a class, you can write on an Explain Everything slide. With a full range of colors to choose from, you can bring your whiteboard drawing to life. And you are not limited to a small space to write on. You have an infinite canvas which means you can zoom in and out of it to fit what you need. You can also add new slides just as you would in a presentation format.
    To write or draw, click the pencil icon. You can change the width by pressing down on it. You can change the color from the bottom left color tiles. Pressing down on the colors lets you choose different colors. 
  3. Sketchnotes - Display visual thinking with Explain Everything. In addition to the ease of drawing, writing, adding shapes, etc. one super reason to use this app for sketchnoting has to do with the infinite canvas you work on. For example, you can draw something that might fit your entire screen. To make more room on your screen, you can select what you drew and pinch it to make it smaller then move it anywhere on your canvas.

    Watch this short video as one of the co-founders of Explain Everything, Reshan Richards demonstrates sketchnoting using this tool:


    Sketchnote sample created with Explain Everything
    by co-founder Reshan Richards during the closing keynote at ISTE 2016. 

  4. Explanation Videos - Using Explain Everything is a perfect tool for teachers to create tutorials and lessons for video-based instruction. It is also perfect for students to use as a tool for showing their understanding. The possibilities are endless as to the content you could create using this format.
    The record button on the bottom of the screen allows you to record, pause, playback. Then you can save your project and export it. 
You have the option to export your project as a Video or other formats as well such as PDF and images.


There is a paid version of Explain Everything (blue icon) and a free version of Explain Everything (white icon). On their website, you can see the detailed comparison between the two.

Find all versions of Explain Everything Here: https://explaineverything.com/download/

Tuesday, March 21, 2017

Add A Pop Of Color Effect - Week 7


Black & white photos with a pop of color are artistic and a great way to draw attention to a focus point. These mini works of art can be created in just minutes. And with by using your phone or tablet, these color effect photos are easier than ever to create. Although there are several different apps available to do create a pop of color effect, one that works very well is called Selective Color Effect. This is an iOS app and can be used on both iPhone and iPad.

Some of the app’s main features:
  • Splash grayscale or any other color on your photo.
  • Multi touch zoom in/out and move.
  • Configurable brush size and splash opacity.
  • Magnifying glass for precise editing.
  • Crop & resize images.
  • Save photos inside the app for future editing.
One great feature is being able to save photos inside the app. All the photos you edit in the app are saved in case you need to go back and edit in the future. And unlike other color effect apps, this app allows you to recolor for free. Which means if you have, let's say, a flower in your photo that is originally yellow and you want to make it purple, you can!

Here’s how the app works.
  • Install the Selective Color Effect app and then open it. 
  • Click Library so the app can find the photos on your device. 
  • The first time you click Library, you’ll see a message: “Color Effect” Would Like to Access Your Photos > Select OK.
  • Once you select and add your photo, it converts to grayscale removing all color.
  • From the bottom menu, select either Color or Recolor to add a pop of color effect.
  • Use the Pan & Zoom tool from the bottom menu to have precise brush strokes. 
  • When you make a mistake, simply click the left undo arrow. 
  • Once you're finished with your creation, click Save. You can add your new color effect photo to your camera roll or share it via various social media sites.
Adding a pop of color effect to your photo to highlight and focus on the most important parts of it has never been so fun! The possibilities are endless.

Note: Because this is a free app, you will see some ads. The good news is the ads are not animated and do not interfere while you’re working on your creation. 

Some web-based options for adding color effect to your photos:

Tuesday, March 7, 2017

Easy Ways To Rotate And Flip Your Videos - Week 5


Have you ever taken a video with your phone that you thought was taken correctly, only to find later it was rotated upside down or in some other direction? Luckily there are different options to help rotate and flip your video.

Using your iPhone or iPad

Video Rotate & Flip app for iOS

  • This FREE app is easy to use and can be installed on your iPhone or iPad. 
  • After you rotate or flip your video, the app will not leave a watermark on your newly saved video. 
  • Another bonus is that there is no time limit. Your video can be short or long in length of time. 
  • Your video will export as MPEG-4 (default) or QuickTime 


Select the video from your photo library, you'll have an option to crop (if needed). On the bottom, you will see icons to Rotate: counterclockwise or clockwise & Flip: vertically & horizontally.
Once your video has been rotated and flipped, click Export on the top-right corner. You can then select "Save Video" and your new video will be saved back into your iPhone or iPad Photo Library. You could also select to save it into your Google Drive.

Using Your Desktop, Laptop, or Chromebook

iMovie - iMovie software must be installed on a Mac desktop or laptop. Import your video (called "media" in iMovie). Your video will be located in "My Media". Click on the video clip you want to rotate. On the top-right you will see a crop icon.

Click the crop icon and then on the top-right you will see rotate left and right icons. These will allow you to rotate your video.

WeVideo - WeVideo is web-based and can be used on Mac, PC, desktop, laptop, and Chrombook. You can sign-up and login with your Google account or register using an email address. WeVideo has a free and paid "premium" version. Import your video (called "media" in WeVideo). Once your video is imported into My Media, drag the video into your Timeline or Storyboard. Click your video clip and you will see a pencil which allows you to edit. Click the pencil. ** Exported video in WeVideo will have a WeVideo watermark and bumper unless you are using the Premium or paid version.

Under Transform, you will see Rotation (Left or Right) & Flip (Horizontal or Vertical).

- - - - -

To help prevent your videos from being rotated in the wrong direction, notice where your timer is when taking video. If you're taking a video and the timer is on the bottom of your screen, your video will be upside down. The timer should be located on the top of your screen.

Monday, February 27, 2017

WOW Everyone With Adobe Spark - Week 4

Adobe Spark is a free design tool suite that allows you to create graphics, web pages, and animated videos in seconds. You can use this tool on your computer browser or your iPhone & iPad. You can access Adobe Spark by logging in with your Google single sign-on or an Adobe ID. Spark contains three different tools:
Post, Page, and Video.

Once you login and click the yellow-circle plus-sign, you'll see this:
Three different creation options: Video (red circle), Page (blue circle), Post (green circle).


Adobe Spark Post
(for creating graphics/images)- Design custom social media images in seconds. You can upload your own photo as a background, search from tons of free photos, or even use solid color backgrounds. Add eye-catching text and in no time you can create images to be used for almost any reason imaginable: social media (with preset sizes for Facebook, Twitter, Instagram, etc), memes, event invitations, custom graphics for presentations or projects, the options are endless. You can download your image to your computer or phone or tablet library. And the ease with which you can create all this on your phone is so great.
Choose what size you want your graphic to be i.e. Instagram, Facebook, Twitter, Poster, Slide, etc.
On the top right, you'll find the tools you need to customize your graphic. 

Adobe Spark Page
(for creating a webpage) - Create magazine-style web pages in minutes. This is an easy and modern looking way to communicate information like newsletters, photos, reports, etc. You’ll find different page designs and layouts, colors, and text to use and can add photos and different text to customize. Everything comes to life by what’s called “Glideshow”; your page will have a smooth sleek motion to it. Sharing your page can be done via social media or by a direct link via email.   
When you begin creating your page, it looks like this:
Once you begin, you can click the plus-sign to add photos, text, buttons, videos, photo grid, glideshow.


Adobe Spark Video
(for creating animated videos)-
Create quick, beautiful, compelling animated videos. You can combine video clips and photos into your video plus add customized text, search free music, add your own personal music, or add your voice. There are different styles and themes to choose from to match your story and message.
You'll see an inspiring prompt that focuses on the story or idea right when you begin a new project.
To help guide your video creation, you can choose to a story template such as: Promote an Idea, Tell What Happened, A Hero’s Journey, Show and Tell, Personal Growth, Teach a Lesson, An Invitation, or Start from Scratch.
Easy to customize and navigate "storyboard" style template.


For your iPhone or iPad:

Tuesday, February 21, 2017

Quick And Easy Screen Recording With Quicktime Player - Week 3


Did you know you could create screen-recordings on a your Mac with Quicktime Player?
Yes, you can, and it’s easy. Make sure you’re running Mac OS X 10.6.8 or later and with Quicktime Player screen-recording, you can record whatever is on your screen, whether it is web-based or not. This sets it apart from web-based only screen-recording apps or extensions which record items that run in your internet browser.


Here's what to do:

  1. Find and open Quicktime Player from the Applications folder located in Finder. If it’s not already there, drag the Quicktime Player app/icon to the Dock for easy access to it.

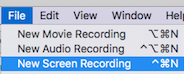
  2. Click File > New Screen Recording
  3. Next to the record button, click the down arrow and select either the internal microphone unless you’d like to add an external microphone.
  4. Click the red record button to begin recording.
  5. This message will appear to select either recording in full screen or dragging to select part of a screen.
  6. To stop recording, click stop from the menu bar (you'll see a tiny stop button on the top-right near the clock) or right-click the Quicktime Player icon from the Dock and select Stop Recording.
  7. Click File > Save > and select a place that’s easy for you to find your recording, like the Desktop.

You now have a video file of your screen recording that is ready to use. You can do things like upload it to YouTube or upload and share it via Google Drive. If you want to enhance your screen-recording further, you can easily import it into a movie editing tool such as iMovie or WeVideo.

Monday, February 13, 2017

Smart Tech-niques With Chrome QR Code Scanner & iPad Split Screen - Week 2

Chrome Now Lets You Scan QR Codes

It’s never been easier to scan a QR code, than it is now with Chrome.


Before, in order to scan QR codes on your phone or tablet, it was necessary to install a separate app. Now with the updated version of Chrome, this is no longer necessary. This works for reading QR codes and barcodes and works on your iPhone or iPad.


First, delete any previous QR reader app on your device and make sure you have the latest version of the Chrome app installed.


Then, you can access the QR scanner in two ways:


  1. From any home screen on your iPhone or iPad, touch your finger to the screen and drag-down to reveal the Spotlight search box, then type and search “QR” and select Scan QR Code.
  2. 3D Touch the Chrome app icon and select Scan QR Code. NOTE: 3D Touch is on an iPhone 6S or later.


After doing either of these, the Chrome QR scanner will open for you to use!
The first time QR scanner opens, you must select OK to allow Chrome to access your camera.
Easily scan QR codes and barcodes with the Chrome QR scanner